Today, I’m going to show you How to use System Restore on Windows PC. The Easiest Windows Error Fixing Method that you should know about.
You can fix your Windows PC issues only if you know, what’s the issue actually, right?
I have a lot of knowledge about Windows troubleshooting, and error fixing but so many times I didn’t even find where the error is coming from.
Yes, it happens. But today I am talking about the System Restoration feature. It’s very simple to use.
Just Create a Rolled back point, when your Windows PC is working perfectly and this restore point will work as a backup file of your whole Windows system.
Whenever your Windows PC stops working perfectly, you can simply roll back all the system settings to the previous date when your system was working perfectly.
Let’s learn more about this Windows feature and how to create the restore point in a Windows PC.
What is System Restore?
System Restore is the feature in Windows that allows a computer system to be rolled back, or restored.
System restore is a powerful tool that in most cases, should not be disabled. This feature just recovers all the settings and software at the date when you created the restore point.
Windows has lots of features but it is difficult to get knowledge about every feature.
It is difficult because we learn about those features we need to know. That’s why a normal user doesn’t have any knowledge about these features like the system rolled back.
Whenever we install, uninstall any software, or make some changes to system settings, or delete any file by mistake from the recycle bin. Also, this feature will help you out with all of these issues.
Example: RAM is running out in your PC and suddenly you decide to remove some unnecessary software and by mistake, you uninstall the audio driver.
And then, you play a video, and the sound is gone, now you remember that you uninstalled the audio driver, but it is too late now.
This Windows Feature can be Rolled back to your PC on the previous date when your audio driver existed in the software, get it.
So, In this post, I am going to show you How to Restore Windows 7 to a Previous Date.
What can I restore from System Restore?
- System Settings
- Application/Software data
- All Files
It means you can roll back almost everything from this in Windows PC.
How to use System Restore on Windows
The system restore is enabled by default, so you just need to create a rollback point because if you have a rollback point saved then You can roll back your PC and roll back settings, software, or files whenever you want. I am using Windows 7 in this tutorial, for your information.
Follow the Steps to Create a Restore Point:
Step 1. Open My Computer >> System Properties

Firstly, Open My Computer where all the drives are available, and click on system properties. It’s just located on the top.
Step 2. System Protection
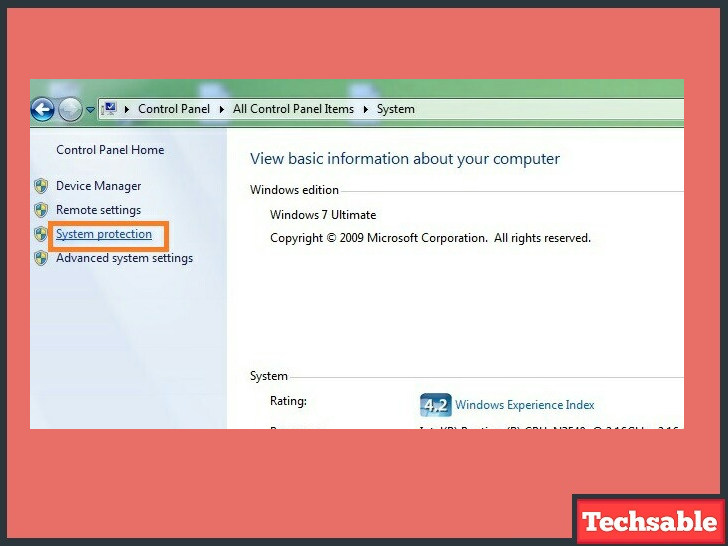 Now you need to click on System Protection located on the left. This is just an easy way to reach the system restore tab.
Step 3. Reach to System Restore (Another way)
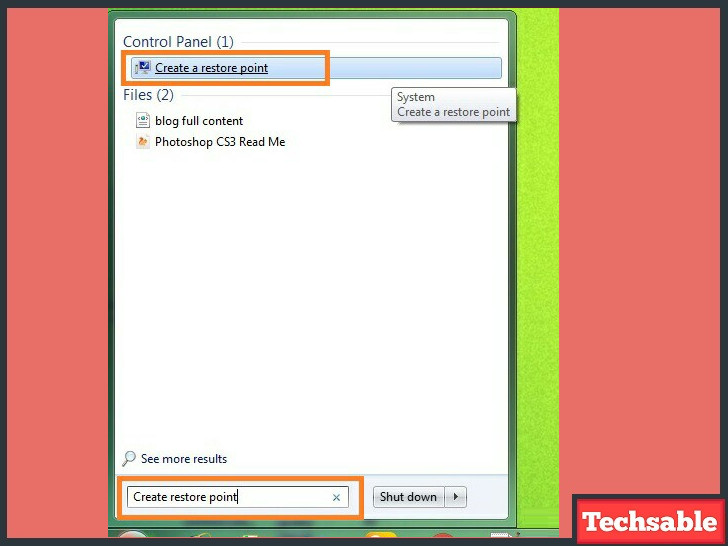
Open the search bar and type Create Restore Point then you’ll see the Create a rollback point option, click on it.
Step 4. Click on the System Protection Tab

In the System properties, click on the System Protection tab.
Step 5. Select Drive >> Click on Configure
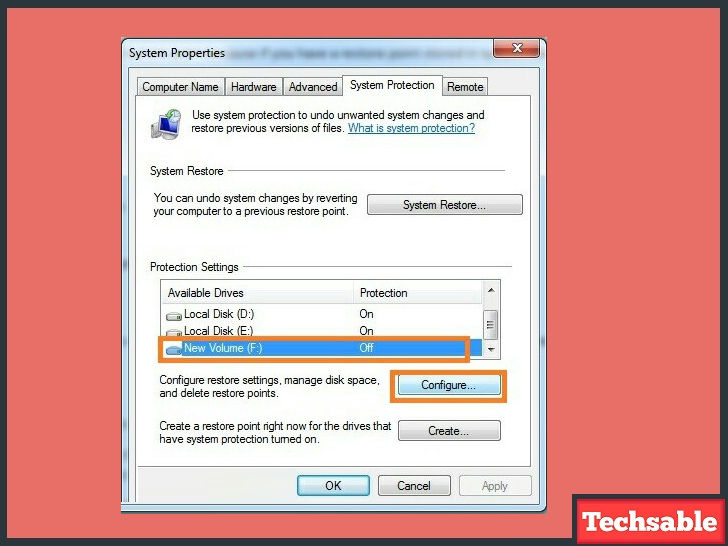
Select the Local Disk which you want to get protected and system restore will Create a Backup of this drive. You also can select All drives.
Then Click on Configure then you will be prompted to choose from two actions
- Restore system settings and previous files
- Only rollback the previous version of files
Choose an option from these two according to your needs, I am suggesting you use 1st one and then click on Apply.
Now you can see the protection option is turned on. System Restore will automatically create a current date rollback point for your system.
You’re all done now, The Rollback point is auto-created successfully. However, if you want to create a restore point manually.
Step 6. Click on Create
As you can see in the above image, there is an option Create just below the Configure option, Click on Create.
Enter any name that will help you to remember the rollback point you’re going to create like tag or label.
How to Restore the System
That’s it, whenever you want to restore the system, simply Open this System restore tab again.
Click on system restore >> choose a restore point >> Choose Drive >> restore.
Step 7. Open System Restore Tab >> Select System Restore point

Open this tab as we’ve earlier mentioned, select the rollback point, and click on next.
Step 8. Choose the Drive to restore
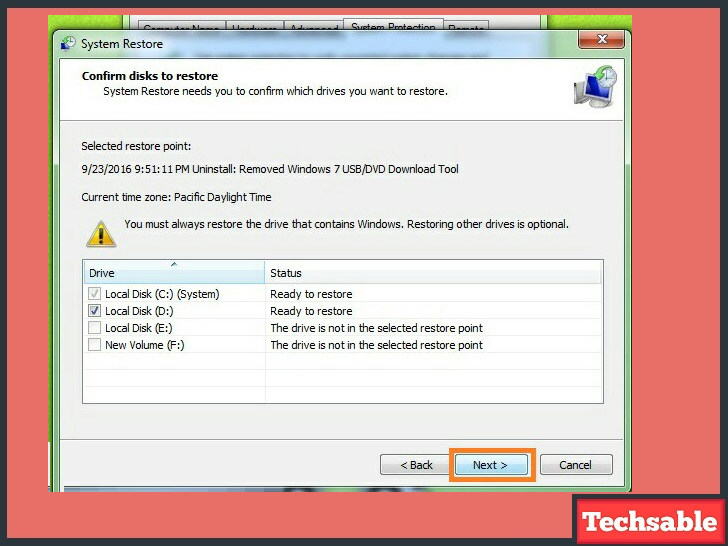
Choose any drive or multiple drives to roll back a previous restore point date and click on next.
Step 9. Confirm Rollback/Restore
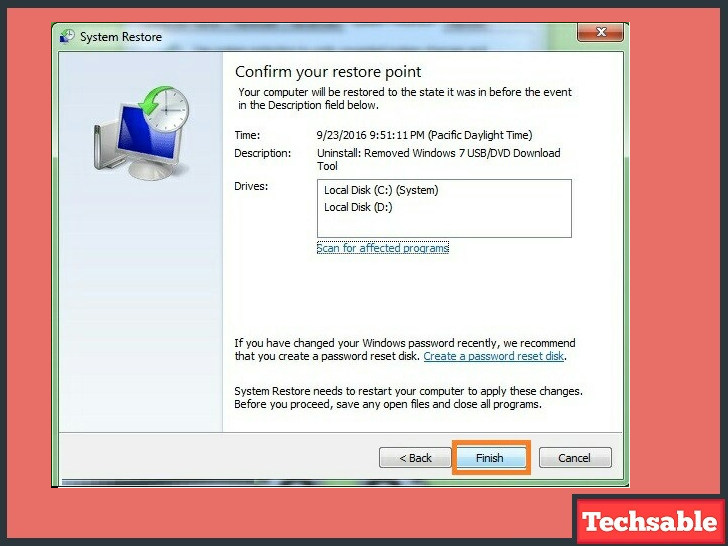
Finally, Click on finish and your system will roll back to the previous date when you created the rollback point and your system was running perfectly.
Your system will take a restart and after that enjoy your day.


