If you just bought a new laptop or desktop with Windows 10 preinstalled and want to know how to partition the C drive in Windows 10 without formatting the drive.
So, Let me tell you you’ve landed in the right place because I also bought a new laptop and created the partition from the C drive.
I am going to share with you how you can make a hard disk partition in any Windows operating system like Windows 10, 8, or 7.
But before that, Let’s discuss some most asked queries about this topic.
How difficult is it to create a hard drive partition?
This method is super simple and totally safe to perform, even a beginner can perform this method.
Is there a different method for different Windows versions?
Absolutely no, the Same method can be used in any Windows version like Windows 10, 8, 8.1, or 7.
Watch Video:
How to Partition C drive in Windows 10 without Formatting
Now, you know you can still use this method if you’re searching for How to partition a Hard drive in Windows 8 or How to Partition Hard disk in Windows 7.
And some people also search, How to partition 1TB Hard disk in Windows.
To those Let me tell you to drive size 1TB, 2TB or 500MB doesn’t change the steps of the method. It totally depends on you what’s the size you’re selecting for making a partition from the drive.
Any size of the drive you’re using to create the partition, the method will always the same.
As you know how to make a partition in Windows 10 While installing.
But it’s a totally different method as compared to creating a C drive partition in Windows 10 without formatting.
So, If you’ve just installed Windows OS and want to create partitions of the drive. Then, this method is not for you.
However, this method is for only those who have Windows OS already installed in the system.
So, Let’s get into the step-by-step tutorial with screenshots on how to partition the C drive in Windows 10 without formatting.
Step 1: Search for Disk Management using Windows Search Bar

Firstly, Open the Windows Search bar and Search for Disk Management, and click on create and format Hard disk Partitions.
I am showing in Windows 10, for other Windows versions. Maybe it will be a little bit different but you have to go to the Disk Management.
Step 2: Look at the Hard Disk Space
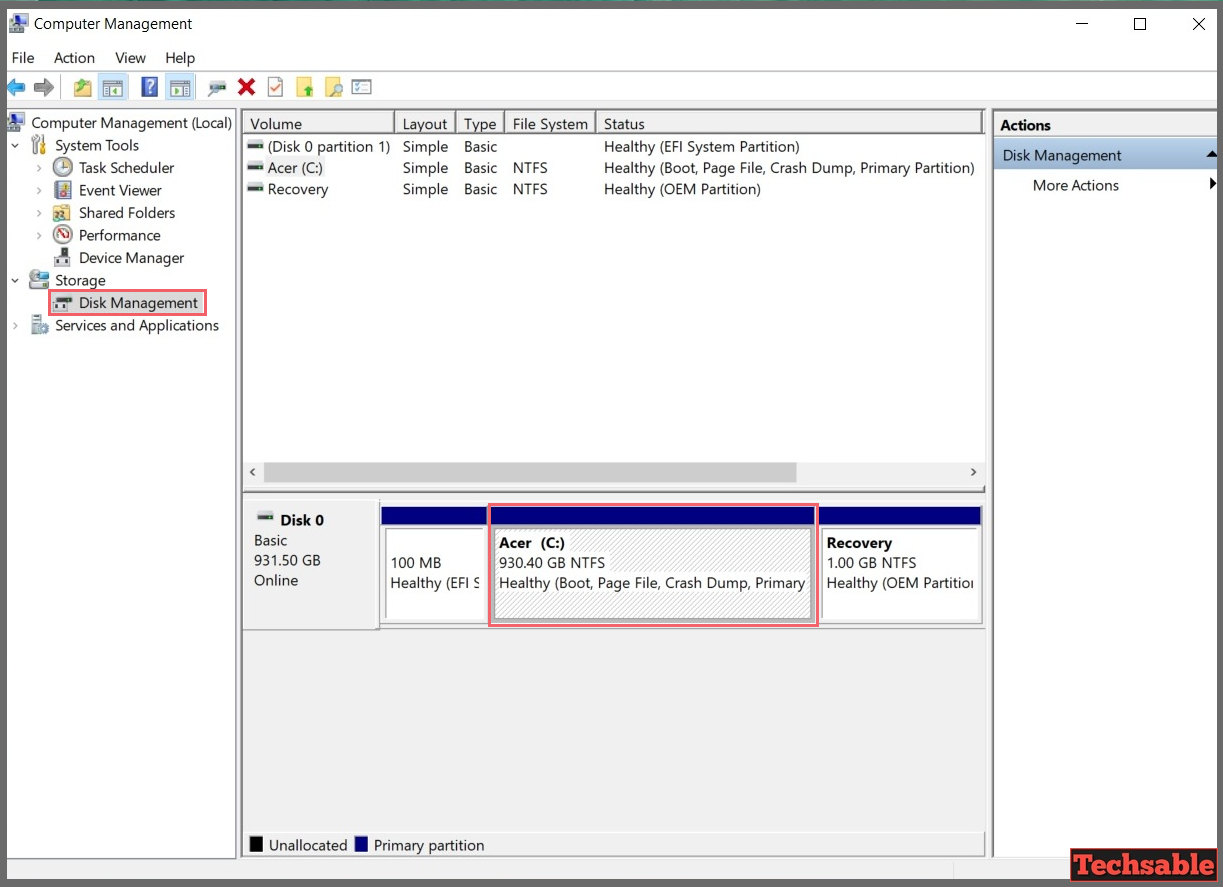
After clicking on Disk Management, you will see the Hard drive section.
As you can see, there is only C Drive available for me with 930GB of space. I am going to partition the C drive to create a new drive.
Step 3: Right-Click on the Drive and click on Shrink Volume

Now Right-click on the C drive and click on the Shrink volume option.
Step 4: Select the Size of the New Disk and Click on Shrink

Here, you need to understand this carefully.
I want a new drive of approximately 300GB and we need to enter the amount of space needed for a new drive we’re creating from the C drive.
For Example, I have 930GB in my C drive, and when I create a new drive of 300GB. Then, the C drive will have 930GB-300GB=630GB. Because we’re partitioning from C drive, right.
So, Let’s Understand what we’ve on the screen right now.
- Total size before shrinking in MB: 952728
952728MB is equal to 931GB. The amount of space we’ve in C drive before creating a partition.
- Size of Available Shrink Space in MB: 859295
859295MB is equal to 830GB (Approx). This is the highest amount of space we can use to create a new drive.
In simple words, We can’t create a new drive of more the 830GB, okay.
- Enter the Amount of Space to Shrink in MB: 319294
319294MB is equal to 311GB. In this section, You have to add the amount of space you need for a new drive.
I want a drive of 300GB and I entered here 319294MB. You also have to enter the amount of space you need for a new drive in MB, not in GB.
If you’re confused with numbers and thinking about how to enter the exact same amount of space in MB so that I can get the exact space for a drive in GB.
Here, I have a trick. You need to enter the 6 numbers in MB and you will get the amount of space in 100GB, 200GB, 300GB, or more.
See, you need to enter 6 numbers and the first 3 numbers play an important role.
For Example, I have entered 319294 in MB and the first 3 numbers are 319.
So, 319294MB is equal to 311GB. I want 300GB for a new drive but I got 311GB of space for my new drive. The first 3 numbers are 319 and I got 311GB. 319 and 311 these are nearly the same.
Also, you can calculate that 3 Lakh (300000) MB is equal to 3GB Approx.
As you can see, this calculation is inaccurate. I want 300GB but I got 311GB but a little bit of difference in size doesn’t matter to me.
If you want to calculate the total exact amount of space, then I am sure you can find an MB to GB converter online tool on Google.
- Total Size after shrinking in MB: 693433
693433MB is equal to 630GB (Approx). This is the amount of space left in C drive after creating a new drive from it.
Now, Enter the amount of space you need (In MB) and click on Shrink.
Step 5: Unallocated Drive
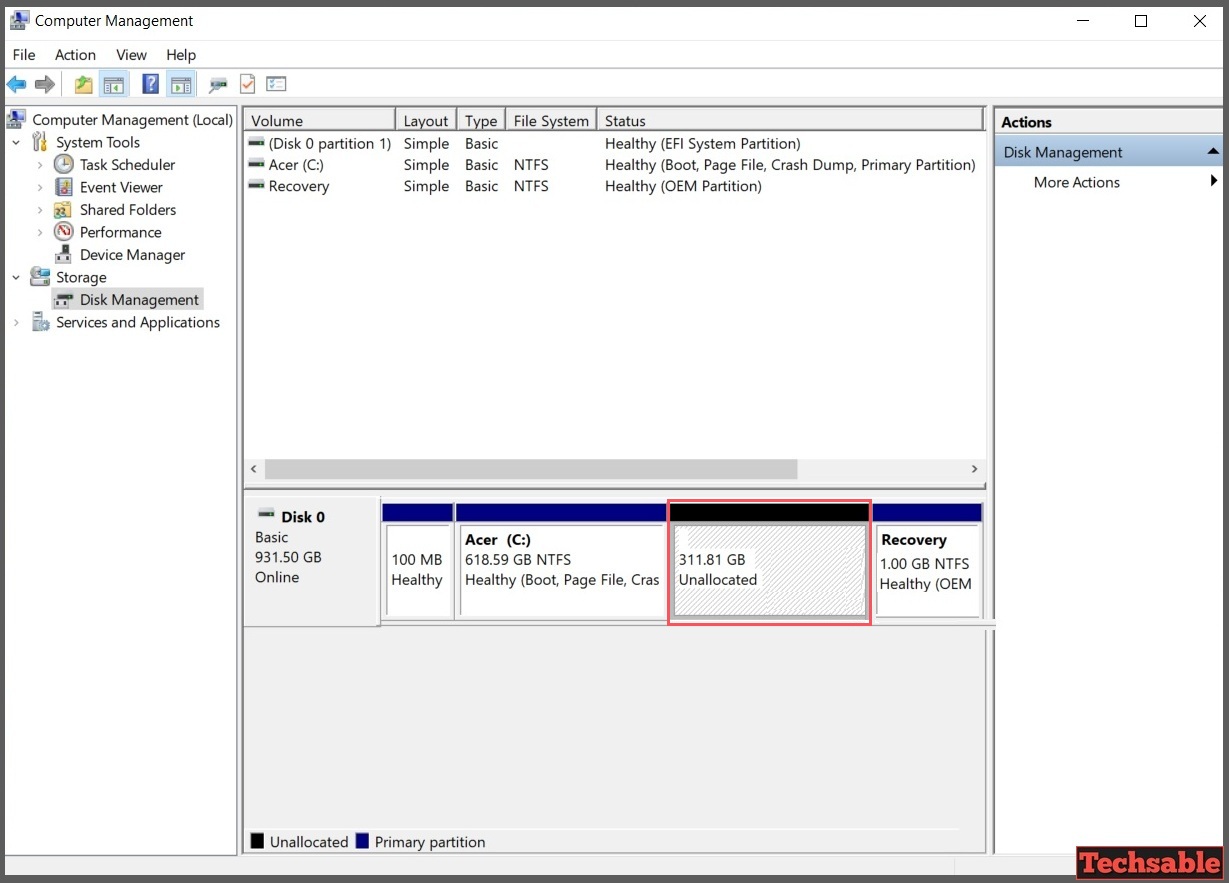
Now, we have an unallocated drive space. We need to assign this drive a name, drive format, and drive letter.
Step 6: Right-click on Unallocated Drive and Click on New Simple Volume

Simply, Right-Click on the unallocated drive and click on New Simple Volume.
Step 7: Click on Next

Now You will see a New Simple Volume Wizard, Simply click on Next.
Step 8: Click on Next

Here it will ask you to specify the volume size, don’t touch anything because we have already selected the right size for the new drive. Just click on Next.
Step 9: Assign the Drive Letter and click on Next
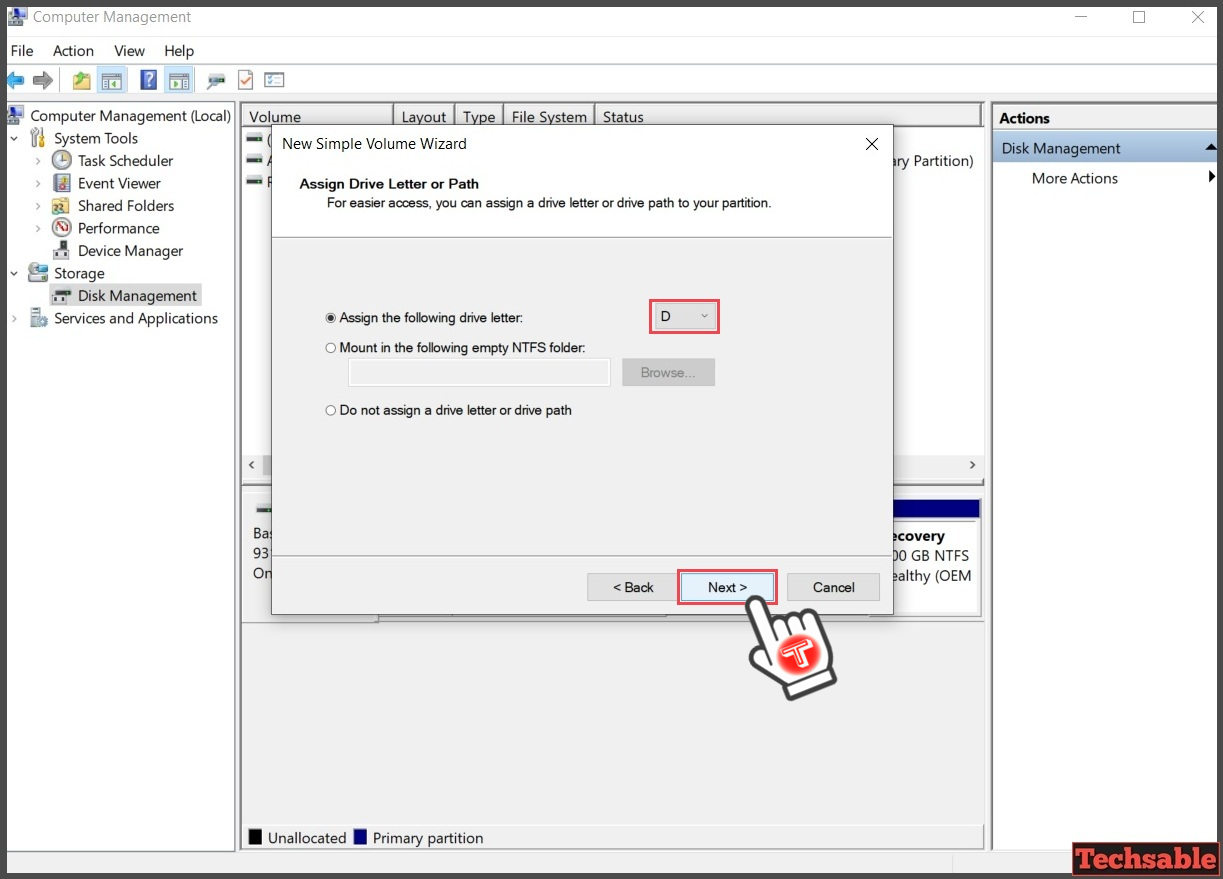
Select the First option and assign a drive letter for the new drive like D, E, or F. I am selecting D for my new drive and clicking on Next.
Step 10: Select File System, Give a Drive Name, and click on Next
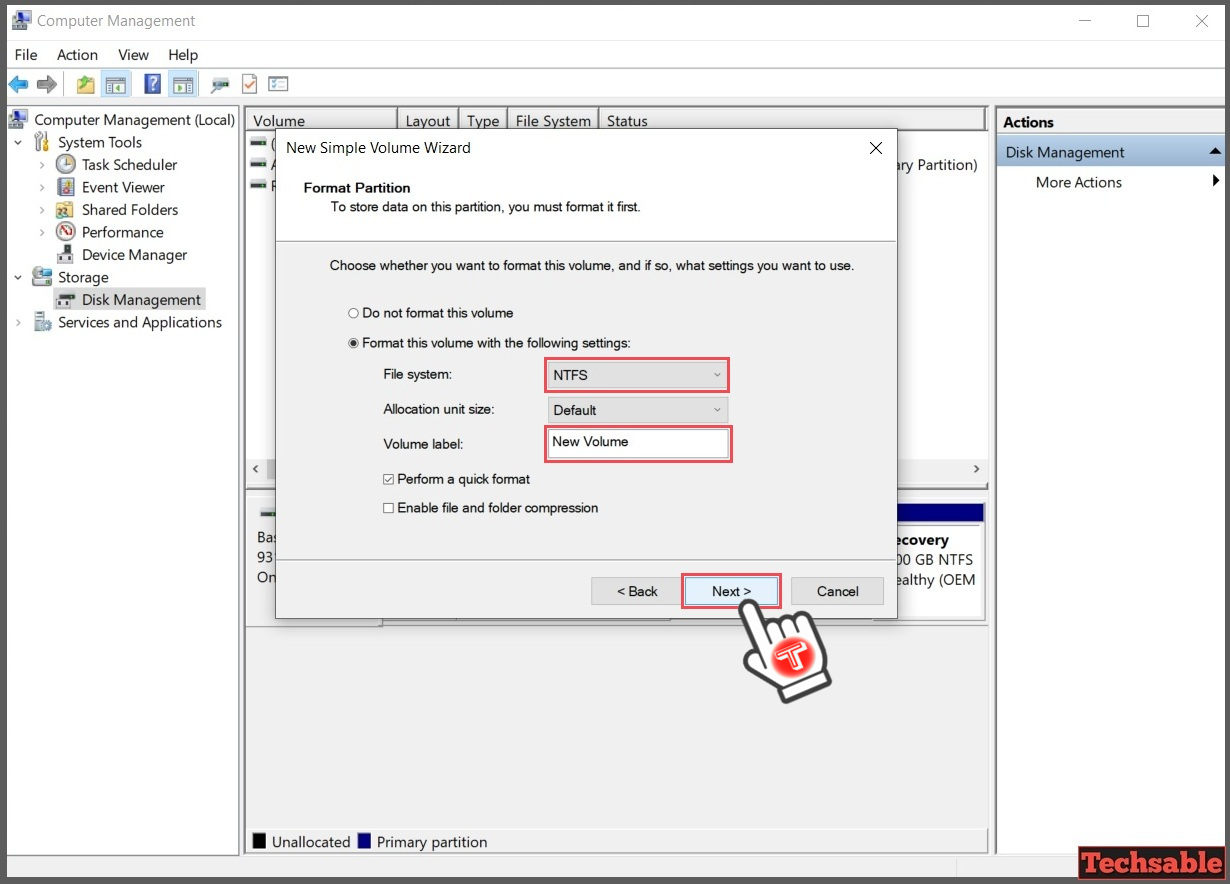
In this step, you need to select the File System and give the volume label (drive Name).
Select File System as NTFS and Enter a drive name by replacing New Volume. You can also change the Volume label later. Now, Click on Next.
Step 11: Click on Finish
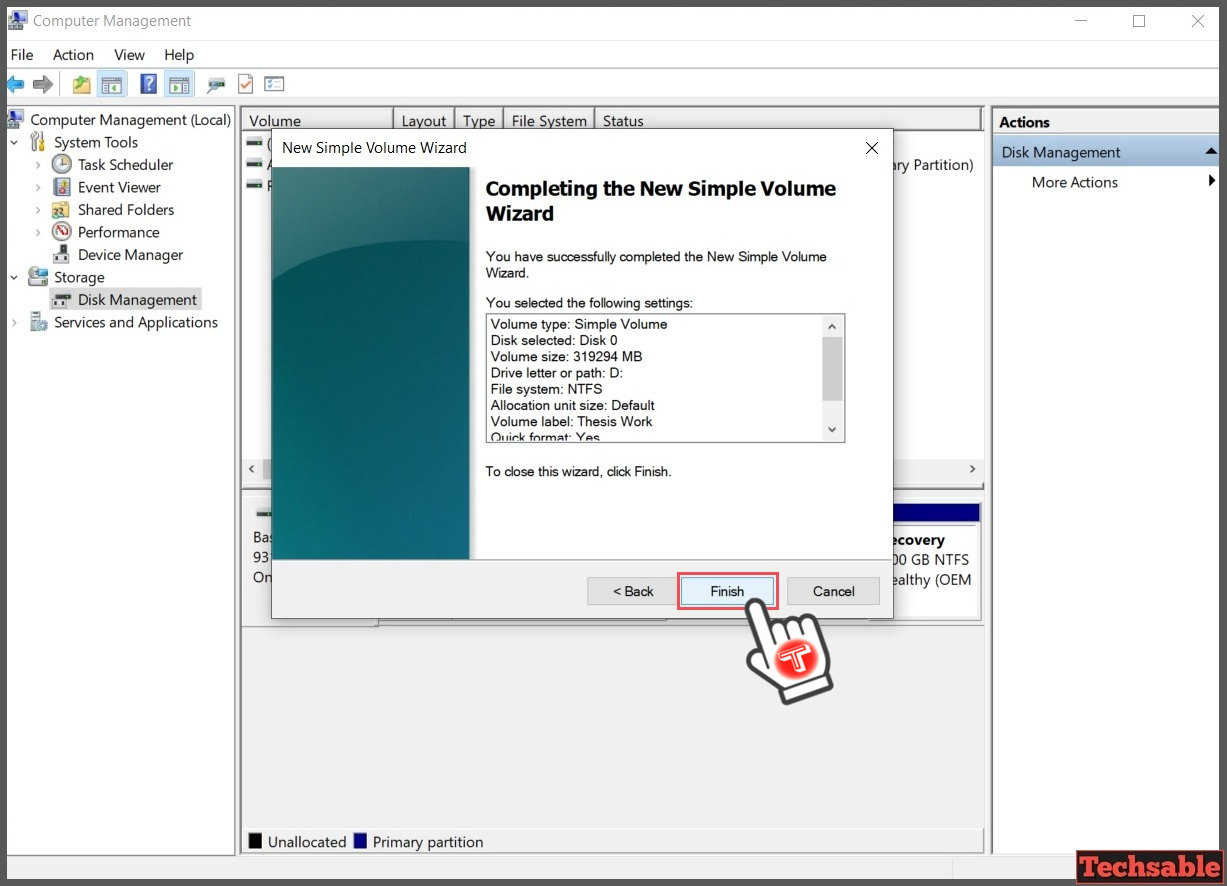
All work is completed, Click on Finish to close the wizard.
Step 12: New Drive is Successfully Created

As you can see We have successfully partitioned the C drive and created a new D drive. Just follow the same method to partition and create new drives as much as you want.
Wrapping Up:
So, now you know How to Partition C Drive in Windows 10 Without Formatting. It seems difficult to perform, as you can see how easy this method is.
Nowadays, Whenever you buy a new Windows system (Laptop or Desktop). You need to partition the drive according to the use. We can’t put all the data in one single drive.
Just follow this method, again and again, to partition and create multiple new drives.
Having any Queries related to the topic, write in comments and Follow our Youtube Channel: Techsable.


